
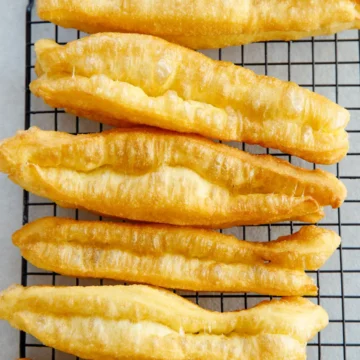
Youtiao, possibly is the most well-known Chinese breakfast. It is usually served with congee or soy milk. Chinese youtiao and soy milk are believed to be the best partners. With this recipe, you can learn how to make youtiao at home with that beautiful golden brown color and crispy shell.
Why you need to try this
I have simplified the process and require the least effort in kneading the dough. With this simple method, you can make super fluffy youtiao with beautiful colors. All we need is to knead the dough until almost smooth, stretch, resting and assembling.
What’s Youtiao- yóutiáo (油条)
Youtiao also known as Chinese oil stick, Chinese doughnut or Chinese cruller is a traditional Chinese breakfast. Youtiao in fact is a deep-fried Chinese breadstick. The perfect match with Youtiao is soy milk. Once the breadstick soaks in the soy milk, the bouffant texture will absorb the soy milk and thus creating a very special taste. It is also a street food in China like many other options like tanghulu, jian bing and etc. You can get it in breakfast restaurants or from street vendors.
Since Youtiao is deep-fried, it is not as popular as in the old days. We eat this possibly only once a month because of our weight problems. But it can always bring happy memories. We ate youtiao and soy milk almost everyday in high school.
Some background theory of making youtiao at home
After testing and reading, I finally get my youtiao recipe figured out. let’s start with my conclusions: the inflation or expansion of youtiao is due to carbon dioxide and ammonia released by the agent (there is a specialized youtiao agent, but we are using baking powder) after chemical reactions. When the gas is generated, the dough expands based on the elasticity and ductility of the gluten. So we need to overlay two pieces together and press a mark in the center. When heated by the hot oil, the outside gets settled quickly. While the inner part is still cooler and soft, the dough can continually expand with the effects of the air pockets.
The dough variations
There are two variations of the youtiao dough. One is with yeast and the other is using baking powder. I started my journey by using a yeast version, but sooner or later, I find it quite hard to handle the yeast youtiao dough. So after reading several “academic” papers about how to make youtiao, I turn my option to the baking powder version. This is the new version and it is quite easier to handle.
💭Tips for a perfect youtiao dough
- I recommend using all-purpose flour because it contains an appropriate content of gluten and can provide enough support for elasticity, but not too strong to make the dough tough to handle.
- Recommend you use a kitchen scale to measure all the ingredients as the amounts of ingredients are crucial to success. If you plan to use cups, remember we use a dip and sweep method. Don’t shift the flour before using it.
- You need to rest the dough for enough time so the gluten can be well relaxed and can expand during the deep-frying process (I will recommend 3 hours). If you plan to rest in the fridge, remember to transfer the dough to come back to room temperature before deep-frying. Cold dough will influence the temperature of the oil and cause failure.
- The dough might be a little bit sticky because it contains lots of liquid content. You may feel the dough is a little bit sticky at first and quite hard to knead, I will recommend using a punching method shown in the video. But please don’t change the ratio or add extra flour to avoid sticky problems.
Oil temperature is the key to success
I will recommend you use a kitchen thermometer to watch the temperature, it will crease the success rate greatly. The temperature should be around 180 degrees C to 190 degrees C.
But if you don’t have one, I suggest starting with the corners.
Ingredients
- 2 cups (300g) all-purpose flour
- 1 tsp. (4g) baking powder
- 1/4 tsp. baking soda
- 1 tsp. salt
- 1/2 tsp. salt
- 1 small egg
- 1/2 tbsp. vegetable oil, you can use softened butter as a substitute to enhance the flavor
- 120ml (1/2 cup) water
- 20ml vegetable oil for brushing
Some tips about the ingredients
baking soda is not necessary but it helps to improve the color. However, it would help to be careful about the amount of baking soda because it will influence the taste.
Adding eggs can help to improve both the color and flavor.
Instructions
Make the dough
Stand mixer method: in a stand mixer, add all the ingredients together and then knead on low speed for 7-9 minutes until the dough is quite elastic. Shape into a ball and then cover with a plastic wrapper and set aside to rest. The dough will be like the high water content bread dough.
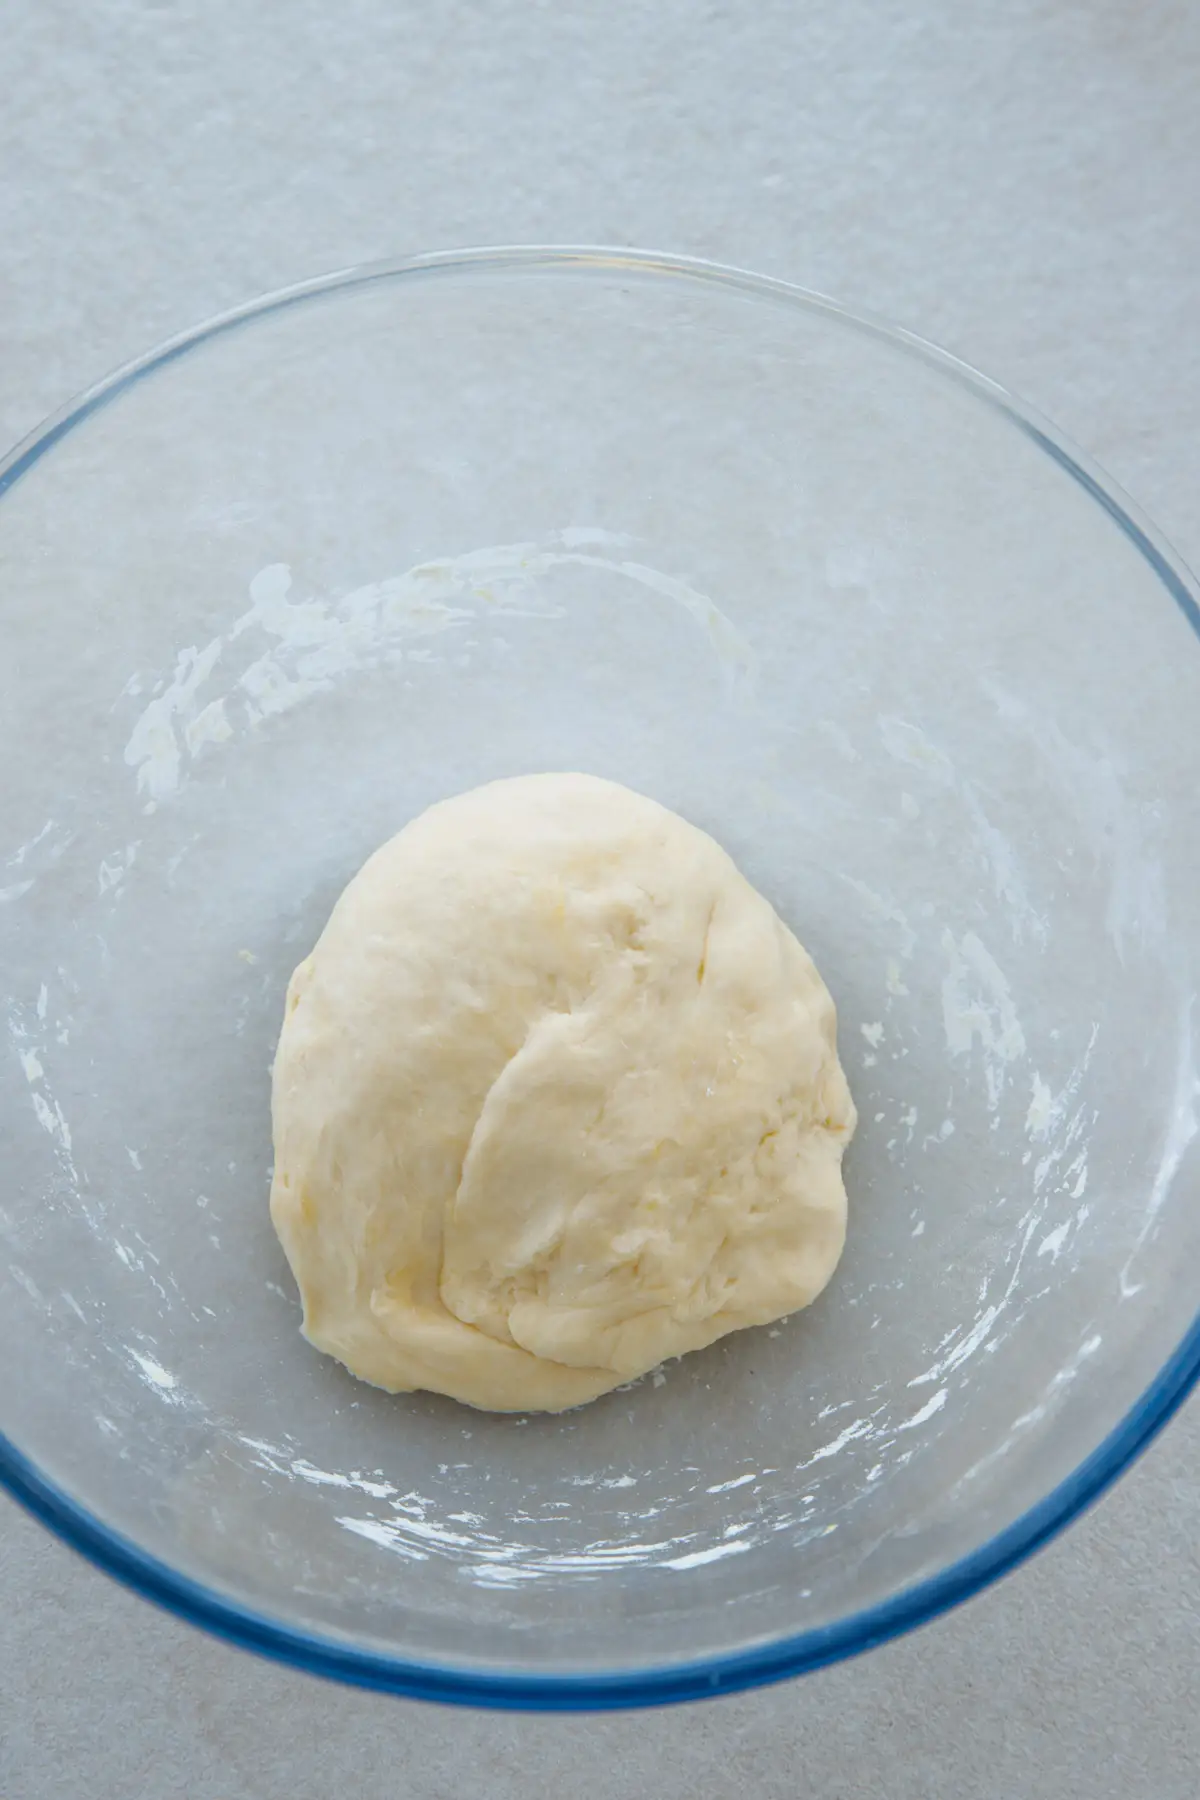
By hand: combine the dry ingredients, baking soda, baking powder, salt, and sugar with flour. Crack the egg and add oil. Stir with a chopstick or a spatula to mix the ingredient well. Then start using your hand. I love the method of using the fist to press the dough gently, this helps a lot with the sticky problem. Once a dough is formed, cover and rest the dough aside for 15 minutes. Then repeat the process until the dough becomes almost smooth on the surface. No need to be super smooth! At this stage, the dough will be super soft but not sticky. We only need the gluten network to be formed. Cover well and set aside for 1 hour.

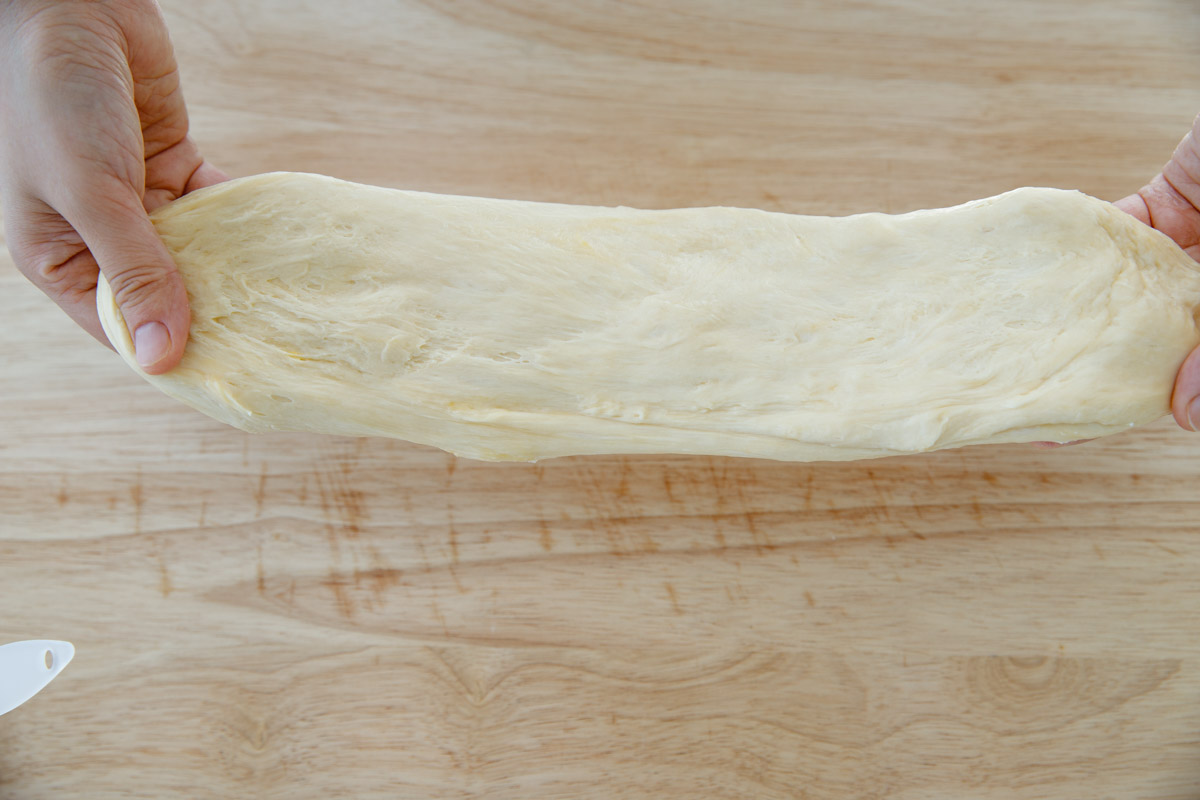
Shape the dough into a long retangle and brush some oil on the surface (this can help to avoid sticky problems after the later stage of shaping and assembling).
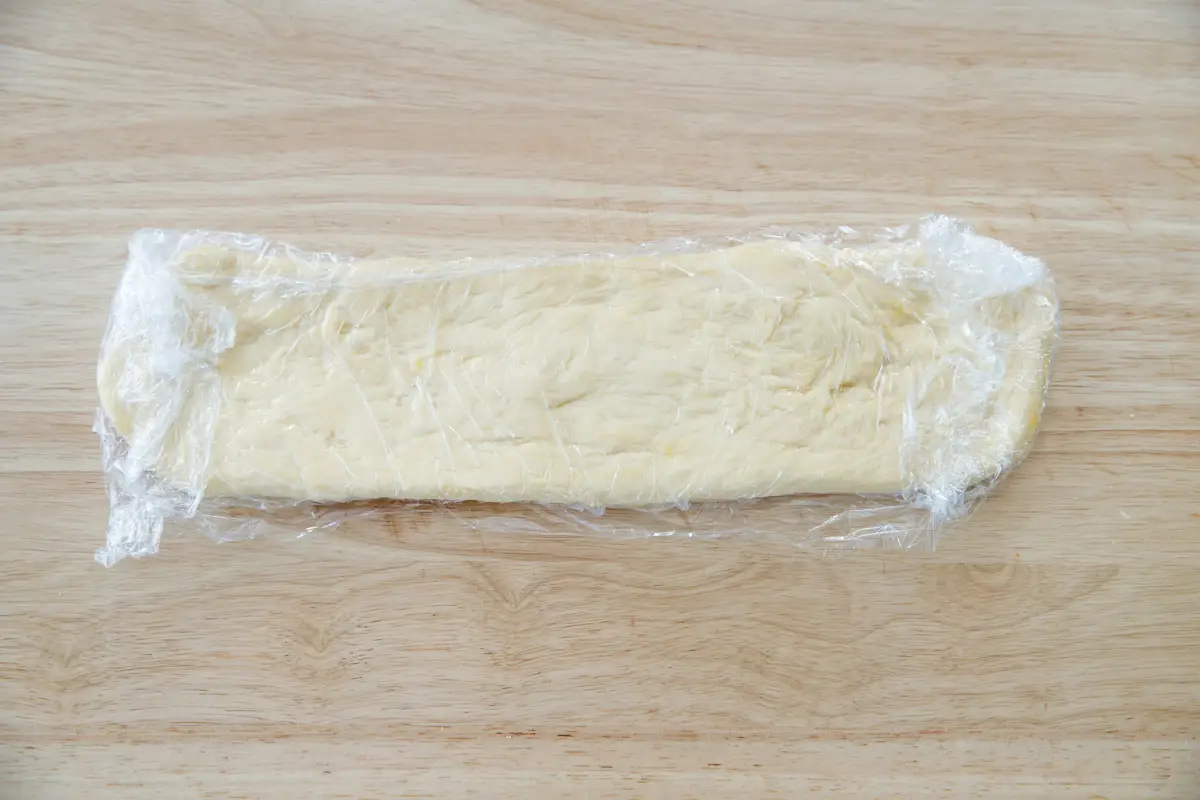
Or you can fridge overnight if you are making the dough the previous night, but remember to move it from the fridge in advance so the dough can go back to room temperature.
Assemble the deep-frying strip
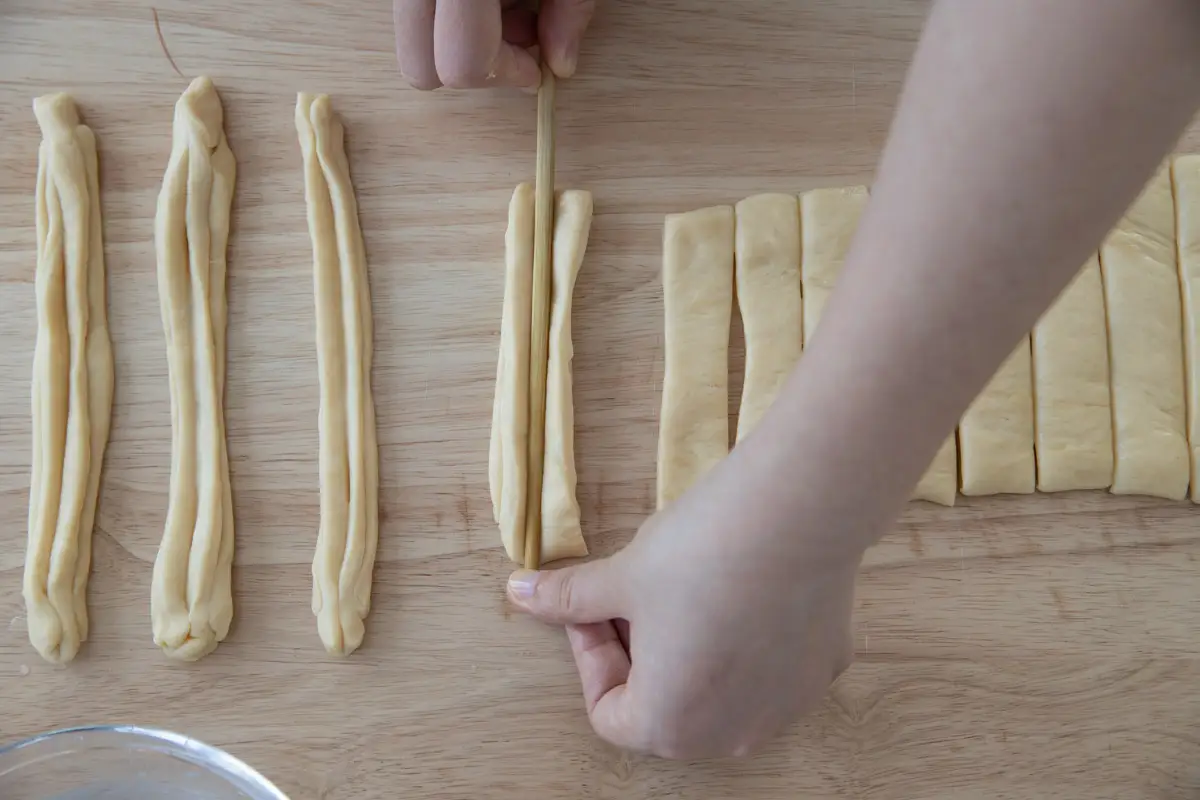
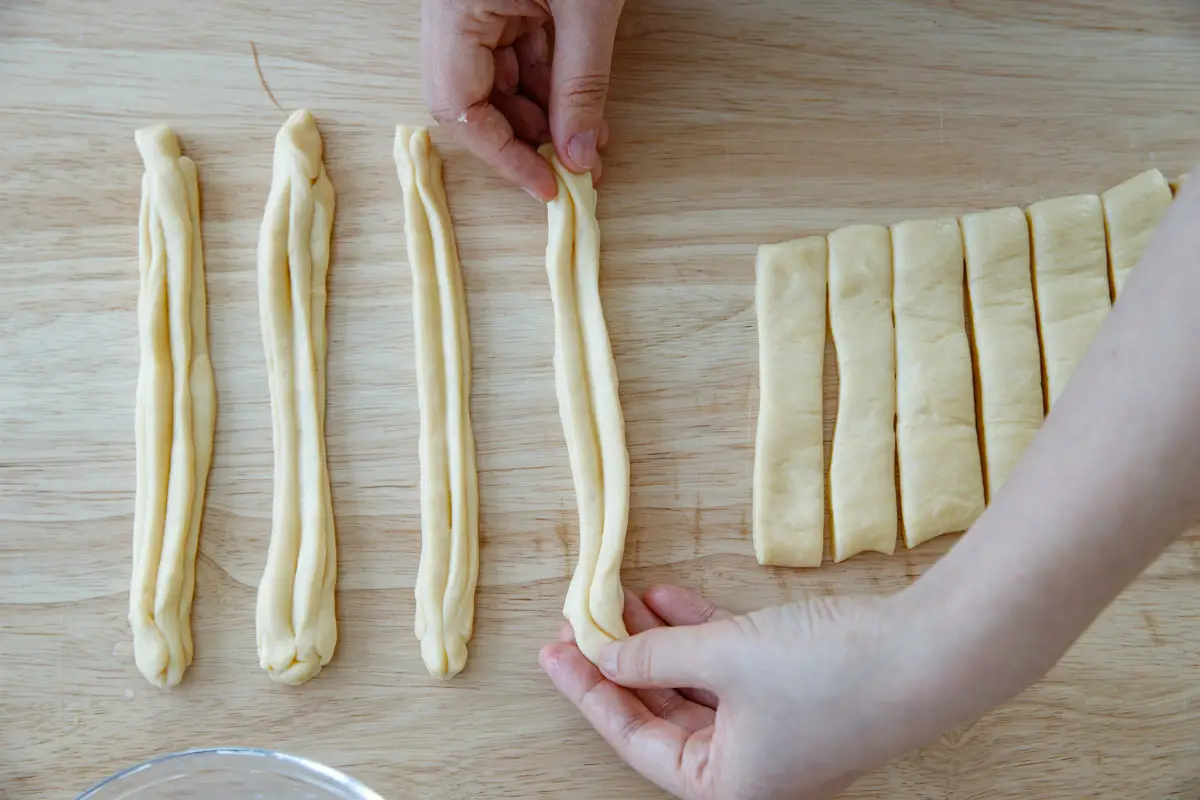
Cut the rectangle into strips around 3cm wide.

Take a chopstick, wet it with some water, and work a line in the center of one piece of the strip.
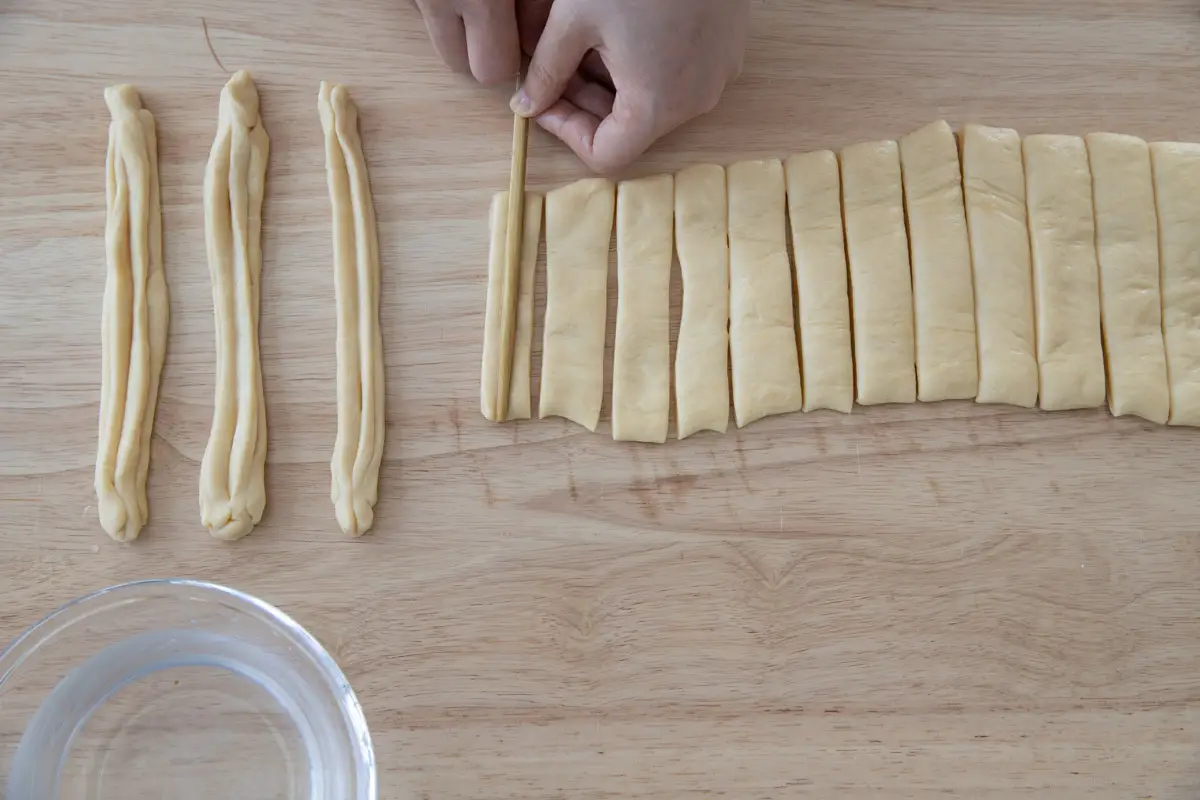
Lay one stripe over the other one and press a mark in the center (lengthwise). Water helps to make sure the two pieces stay together in the deep-frying process.
Deep-fry youtiao
Heat the oil to around 180 to 190 degrees C (400 degrees F). Then hold the two ends and slightly stretch the strips (or slightly adjust the length according to your frying wok).
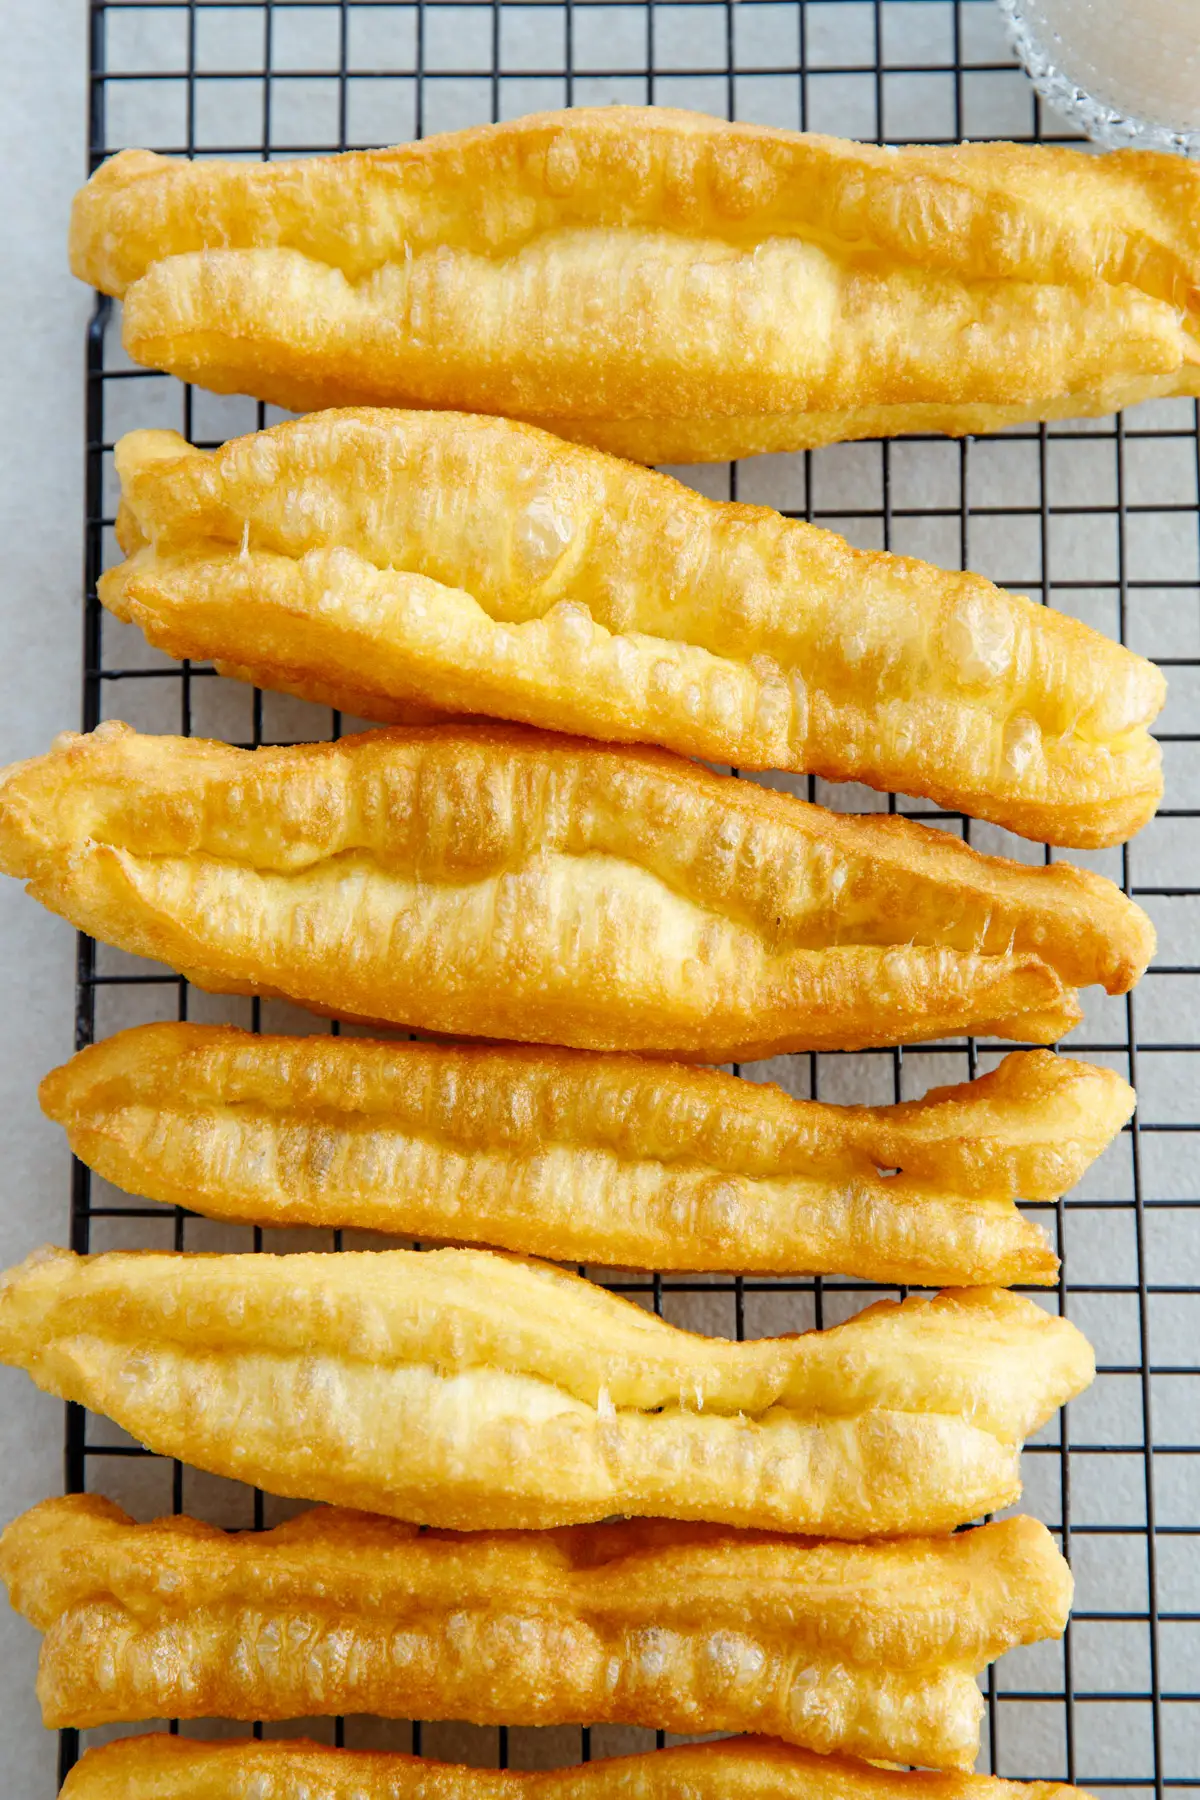
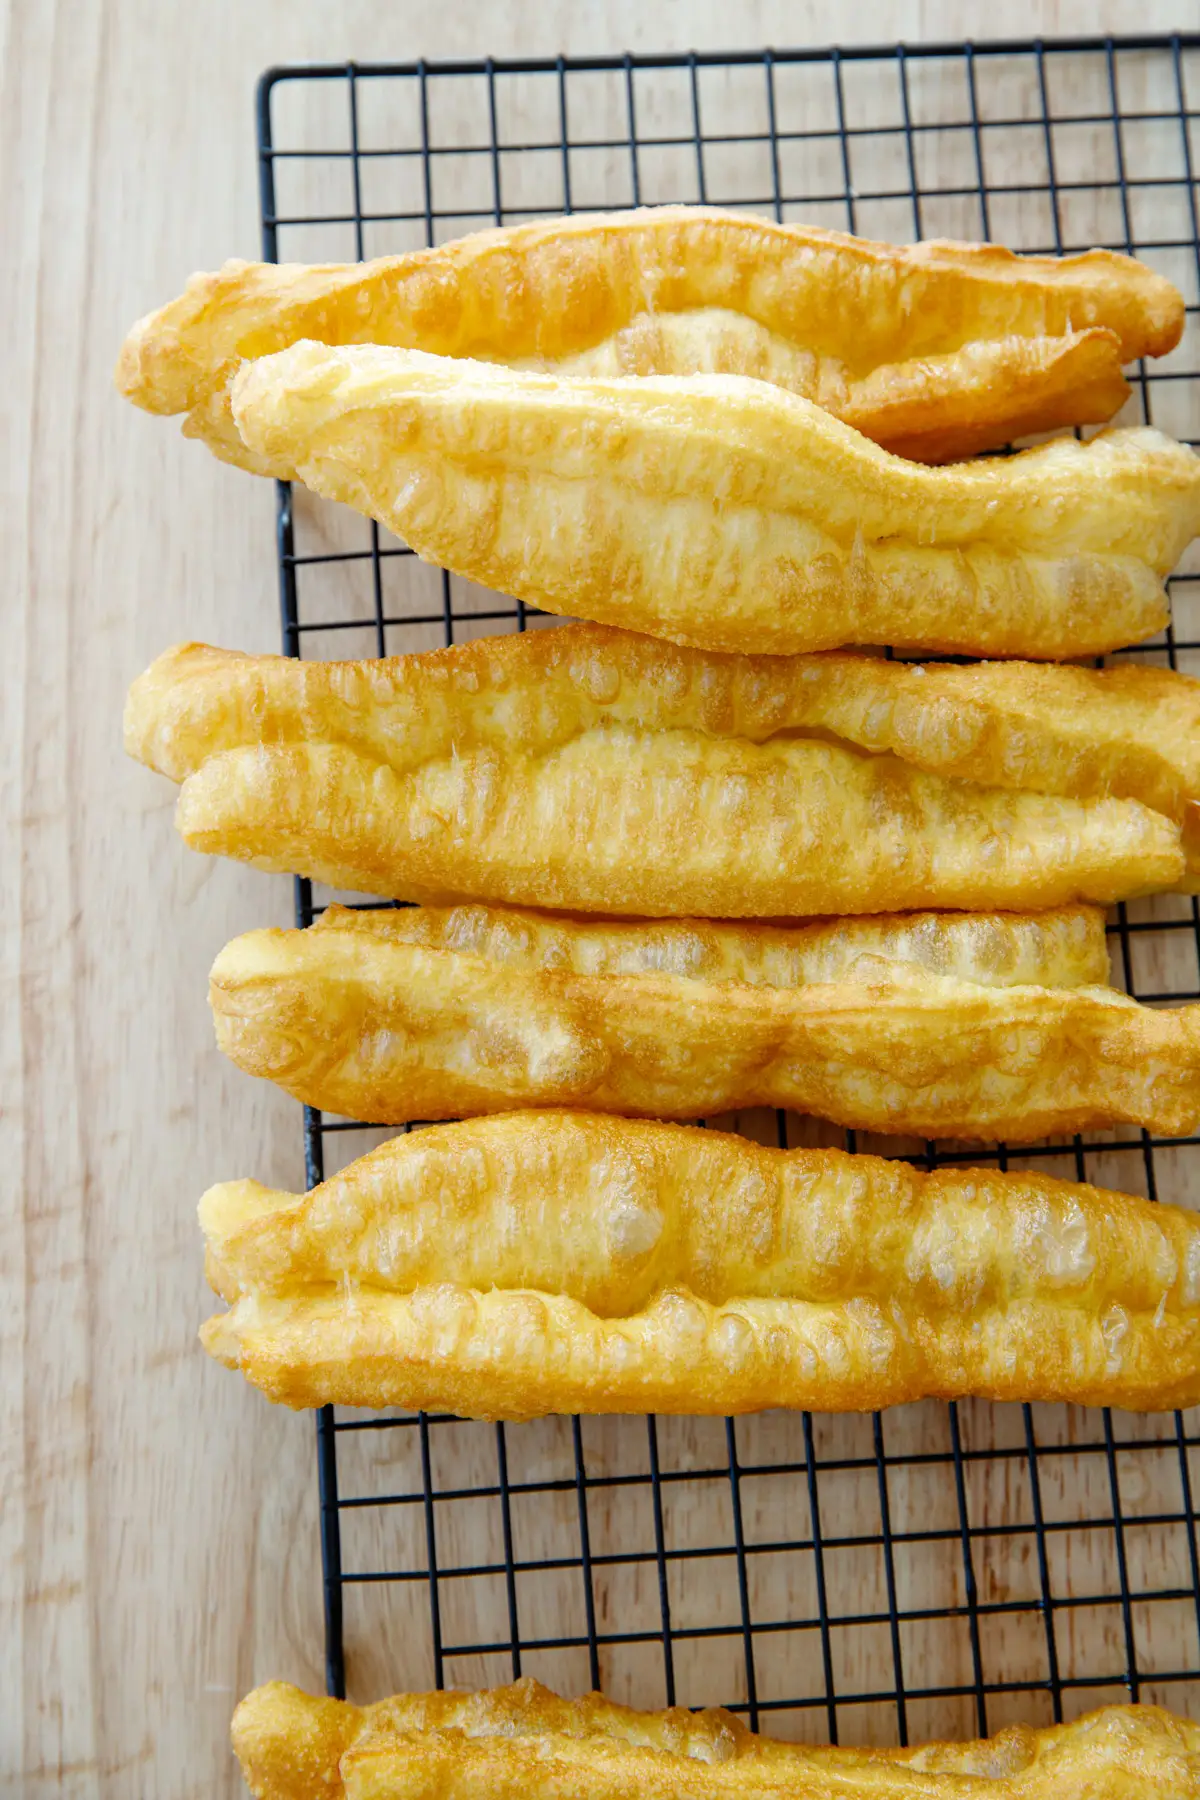
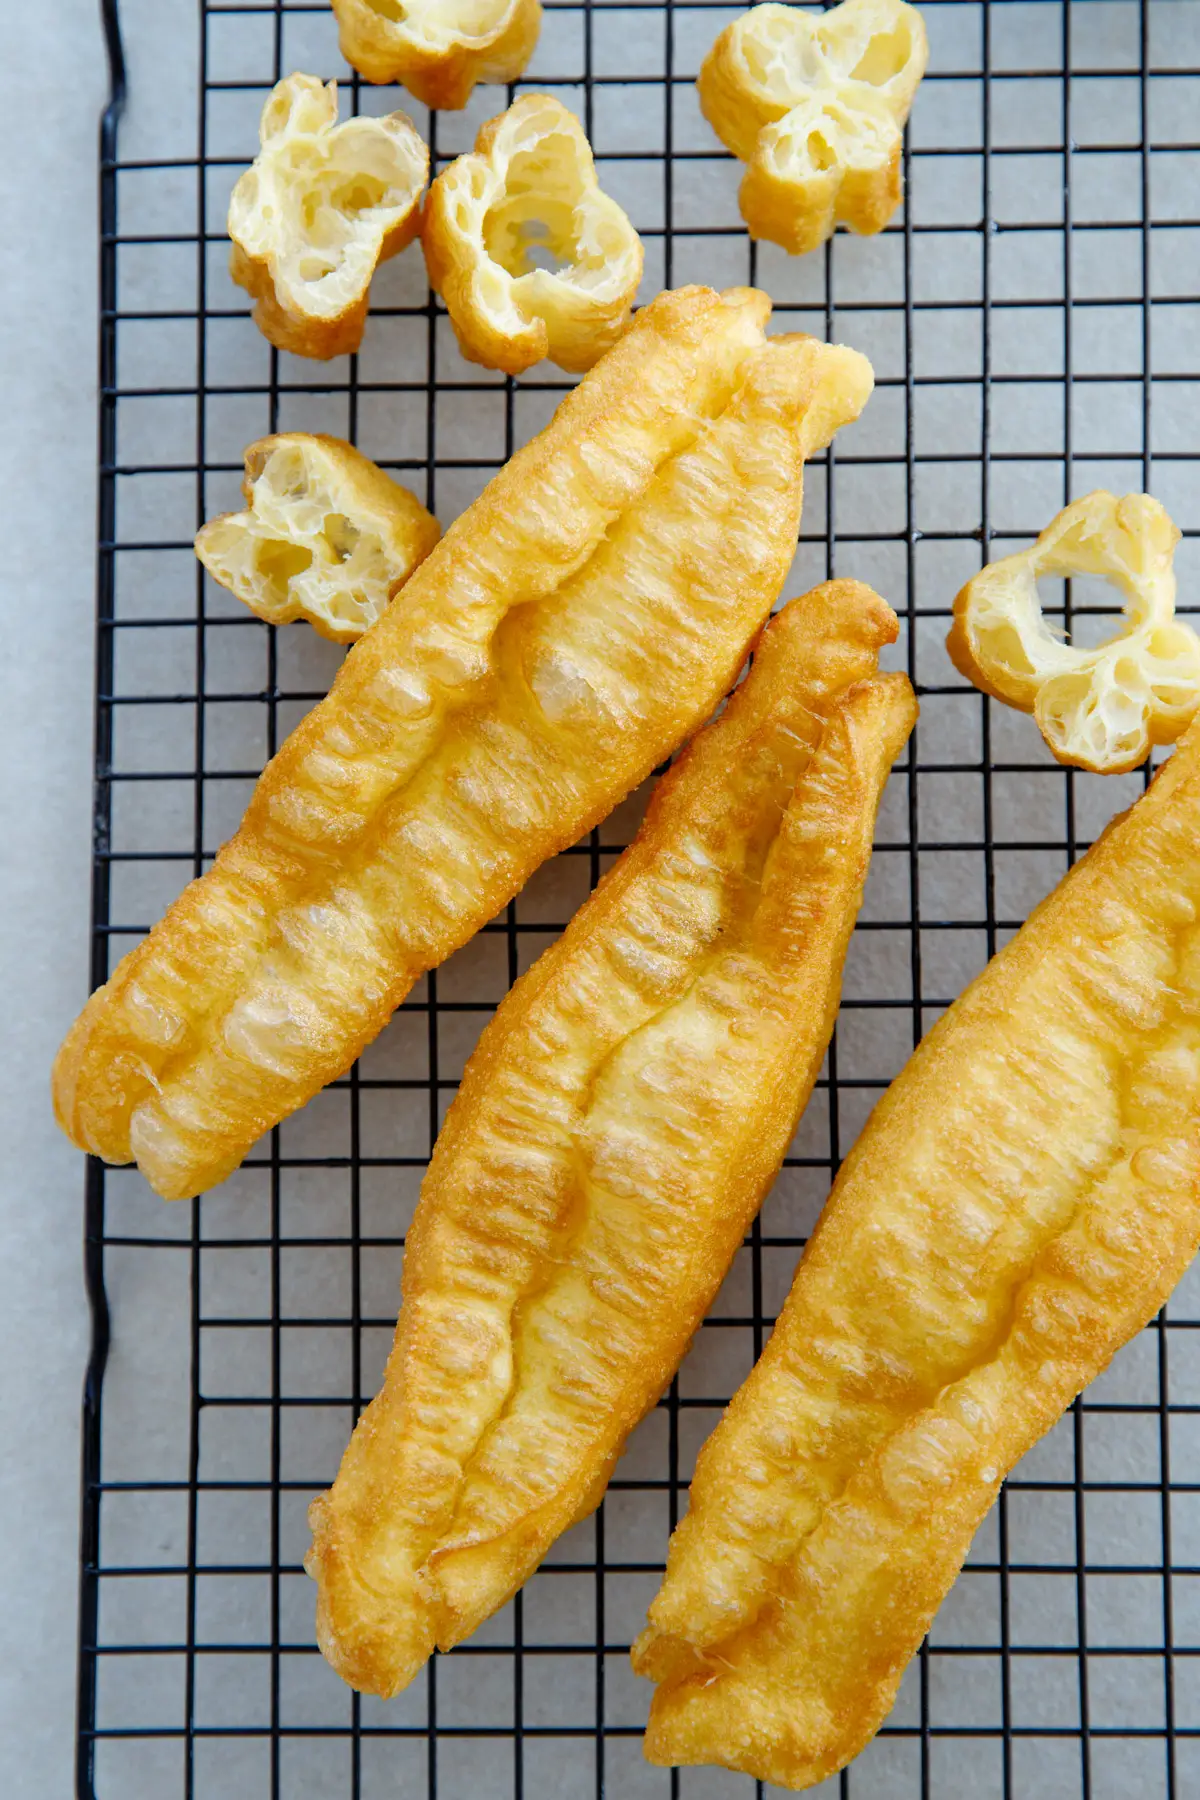
Gently slide into the oil and roll around continuously with chopsticks. This can prevent any surface of the youtiao is overcooked and thus firmed too quickly. Once the youtiao expands and turns golden brown. Transfer to a baking rack to drain out the extra oil. The whole deep-frying process may need 1 minute.
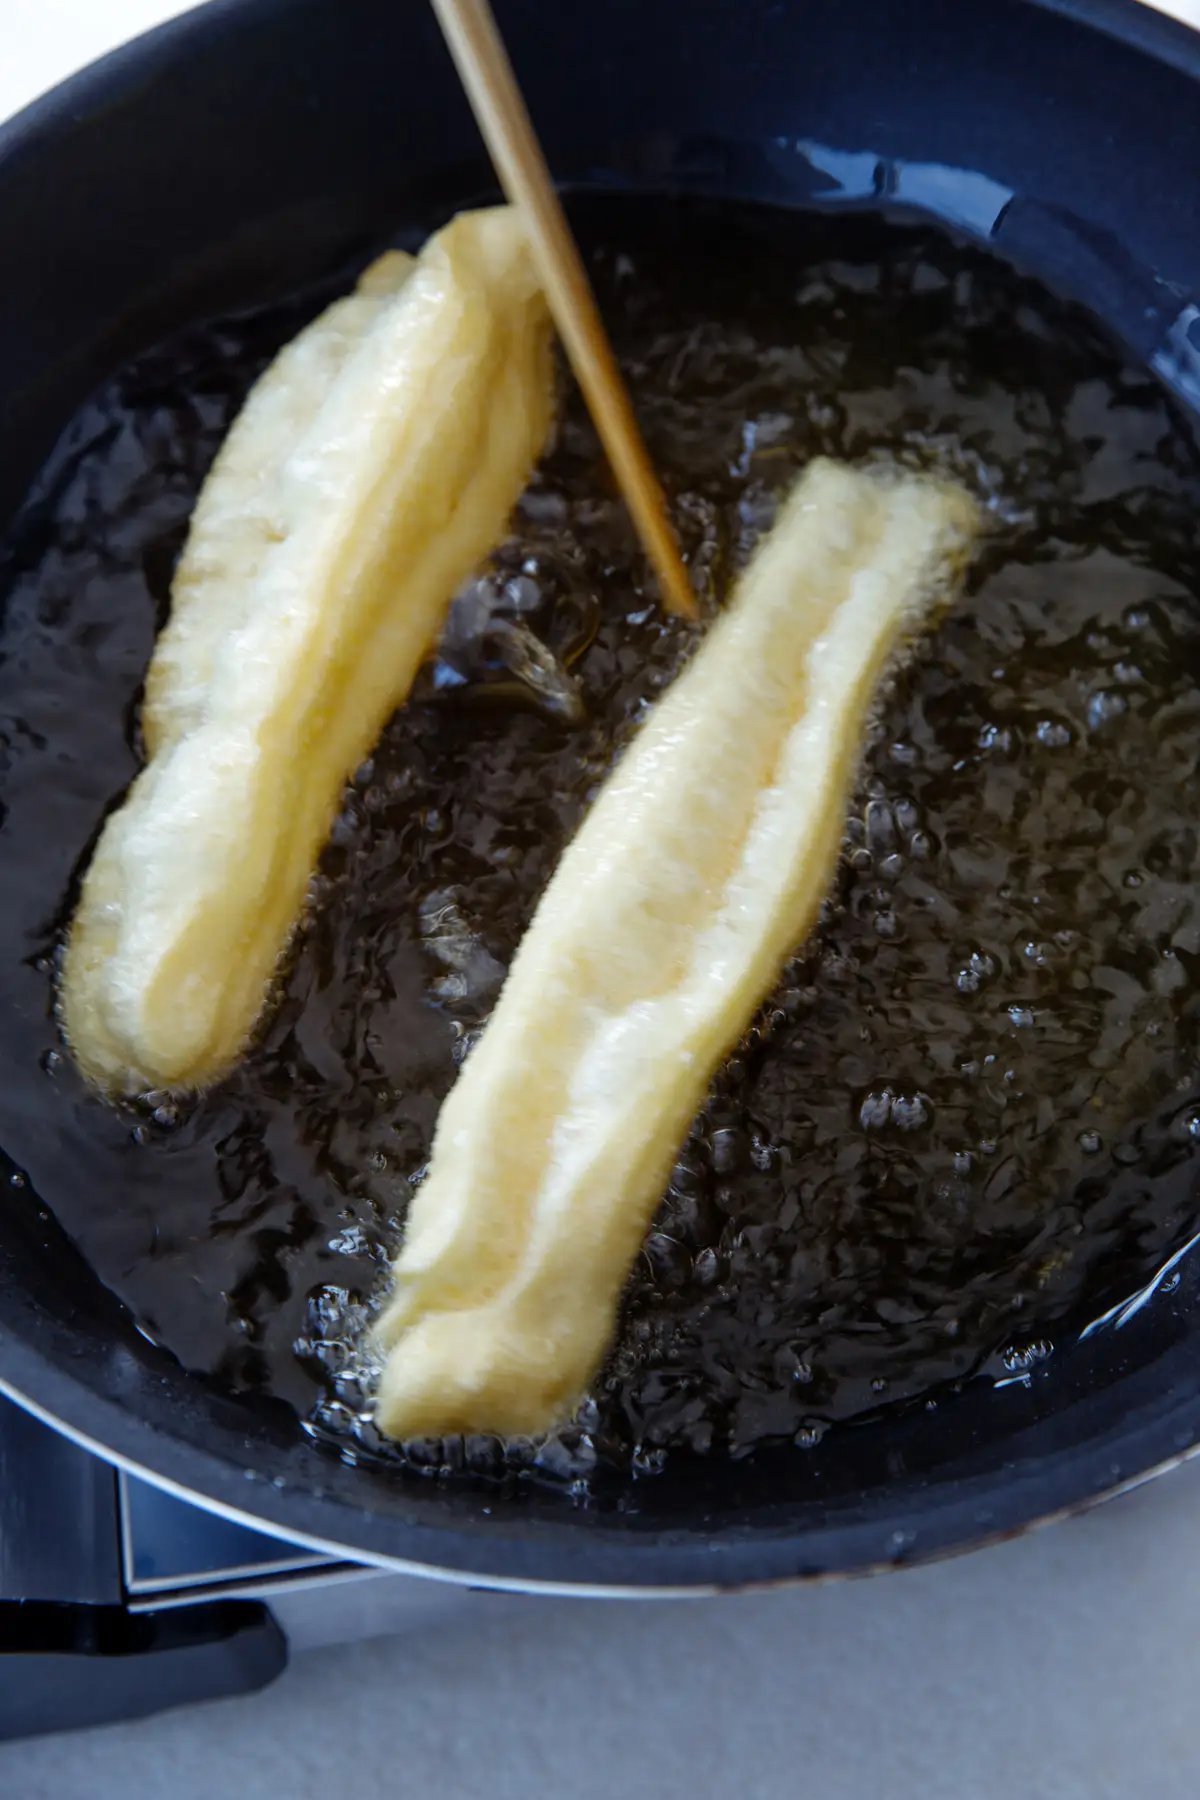
Do this by batch and use a slow fire to keep the temperature of the oil. You can fry two youtiao each time but adding too many ones will decrease the oil temperature immediately, and usually, we don’t have enough space for them to roll and rotate. So take your time.
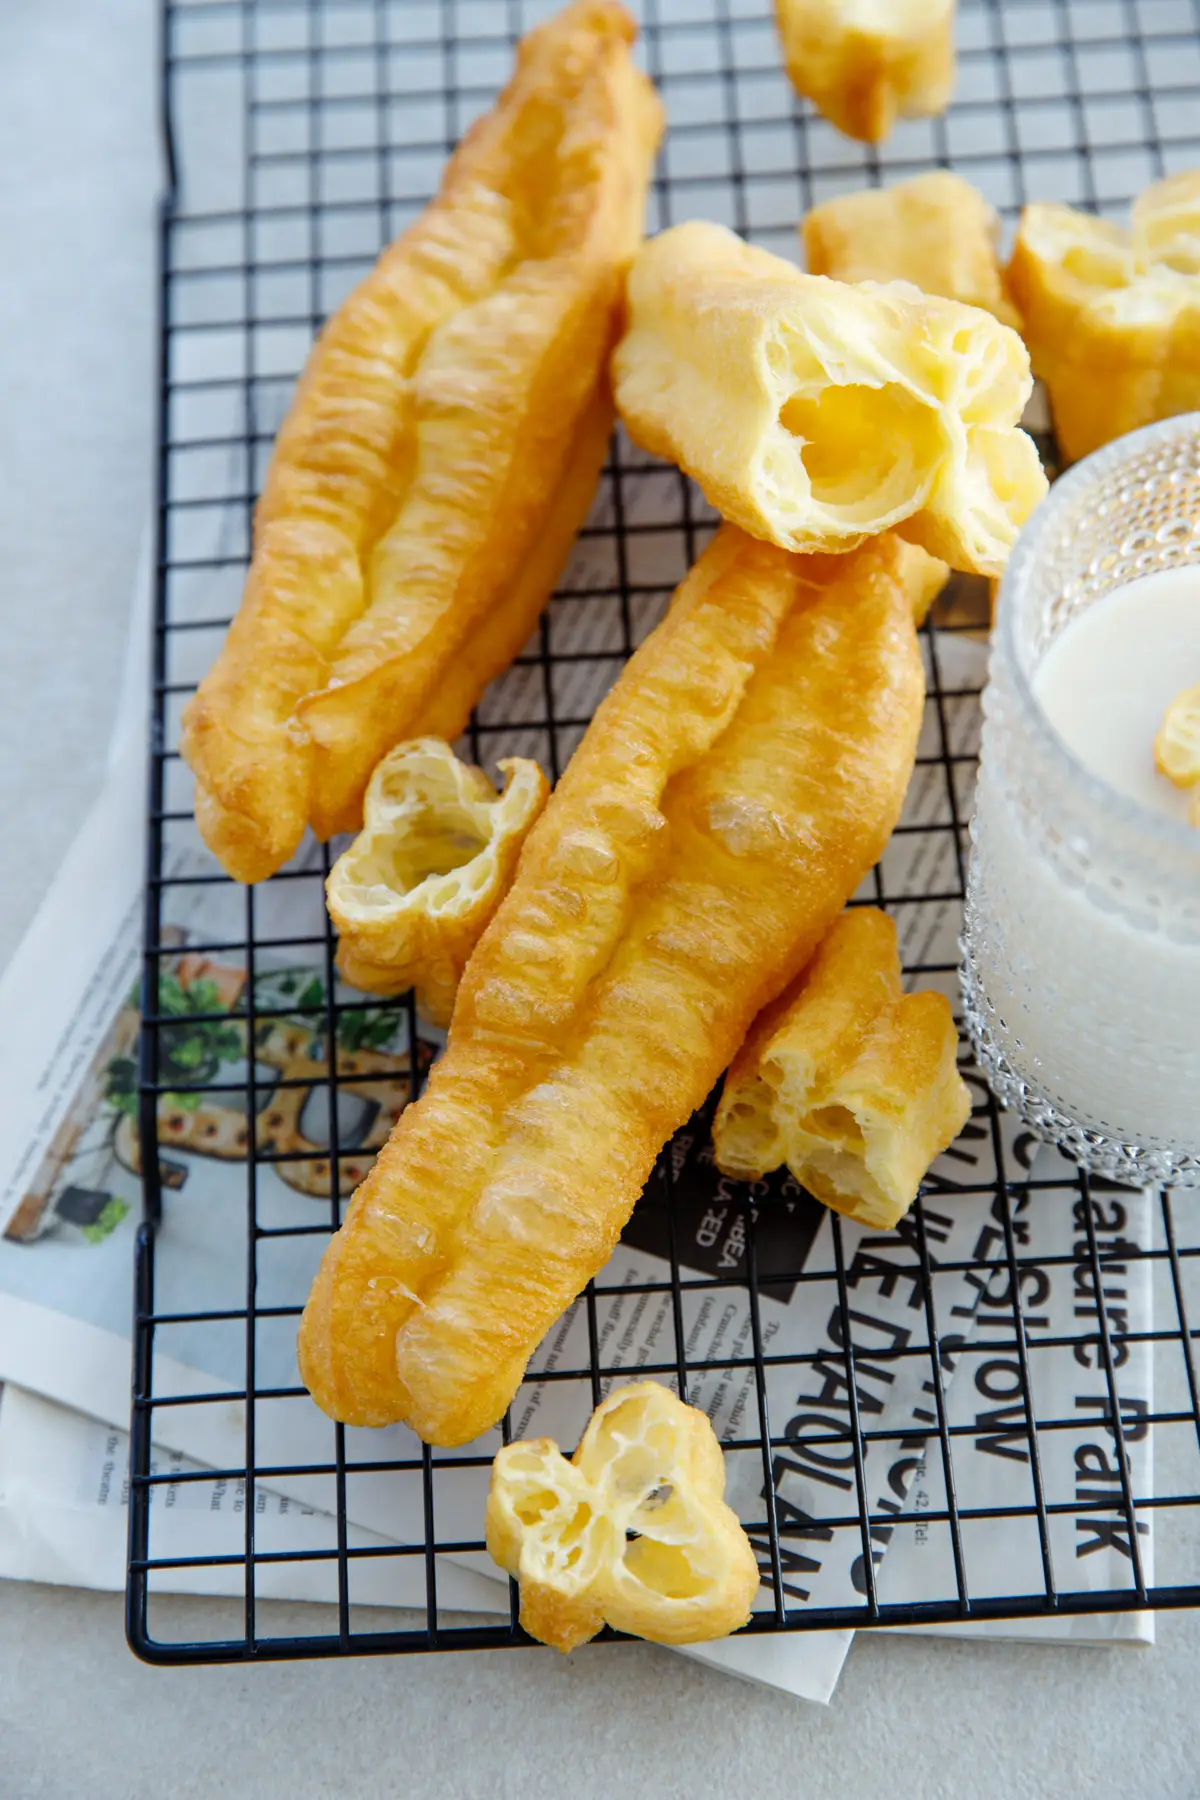
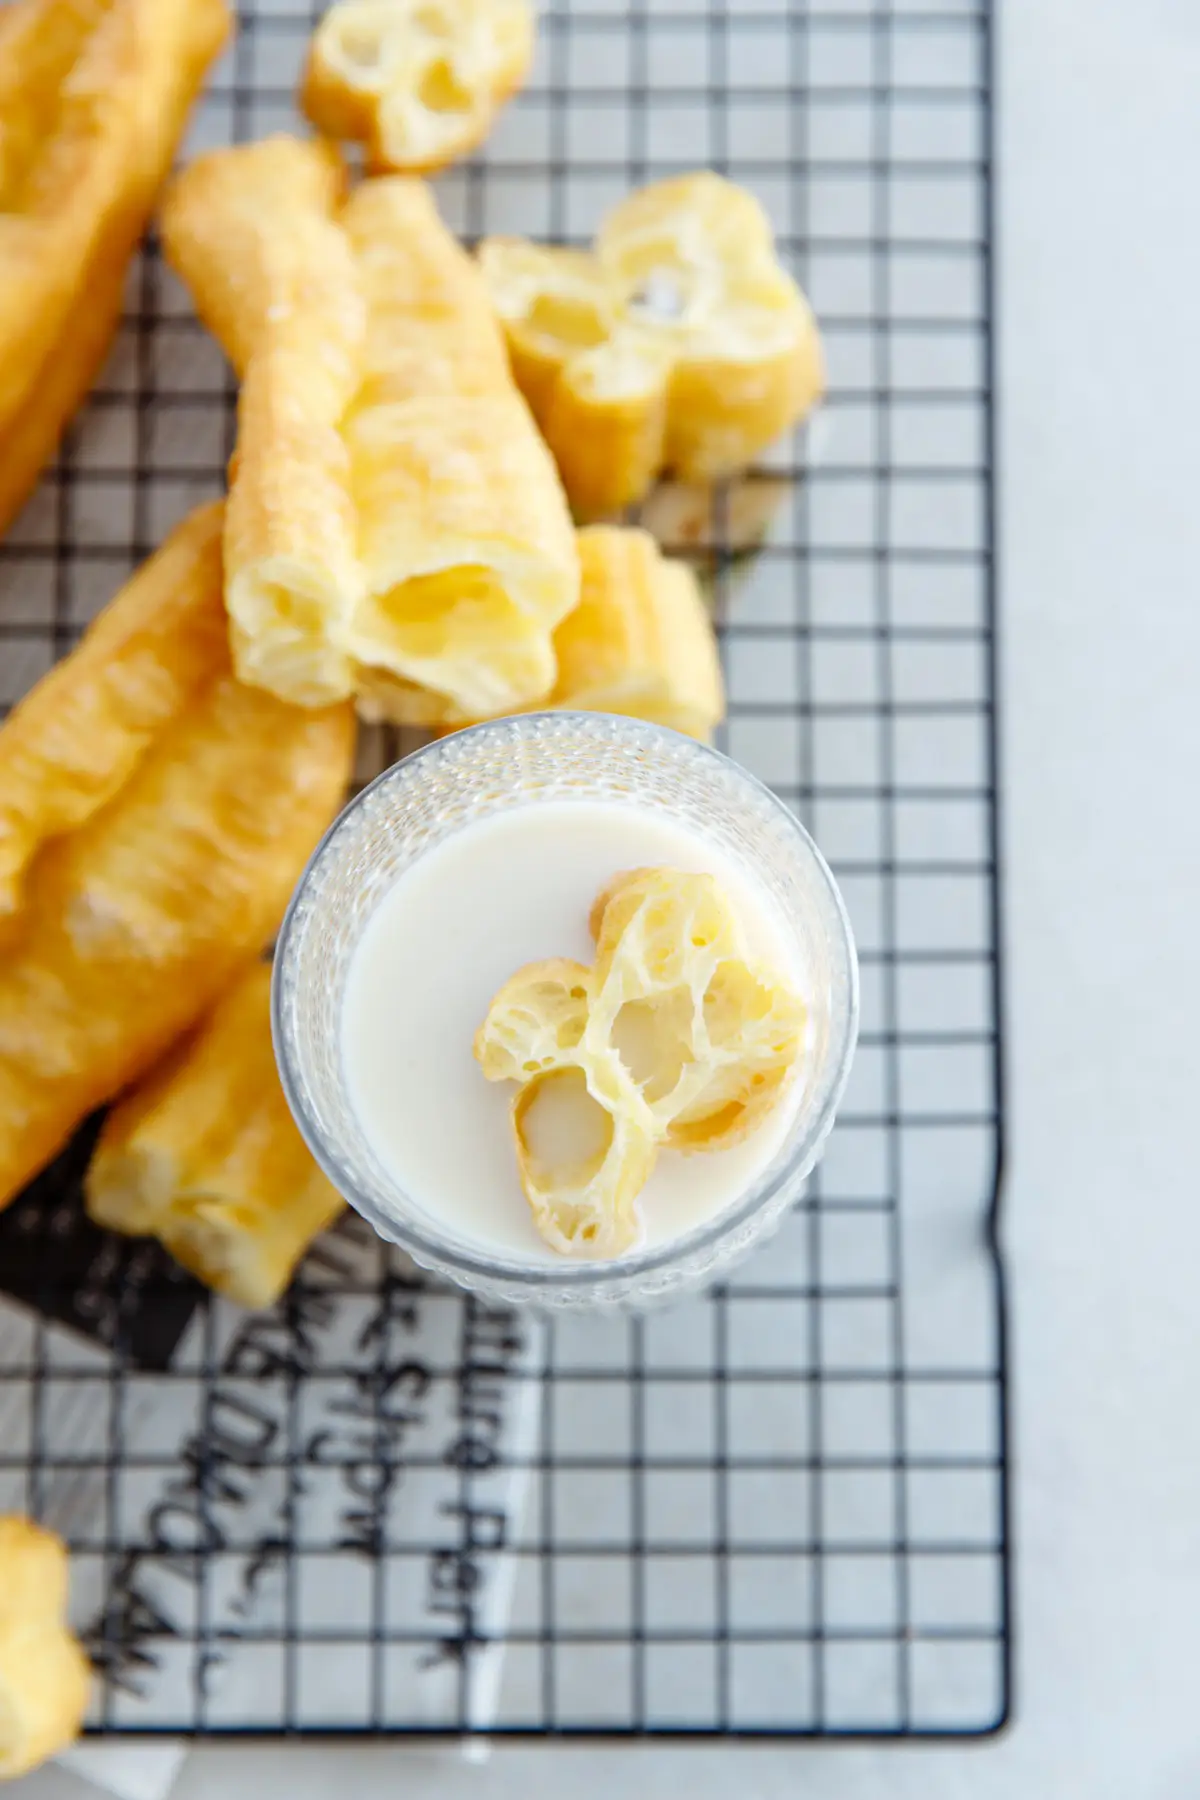
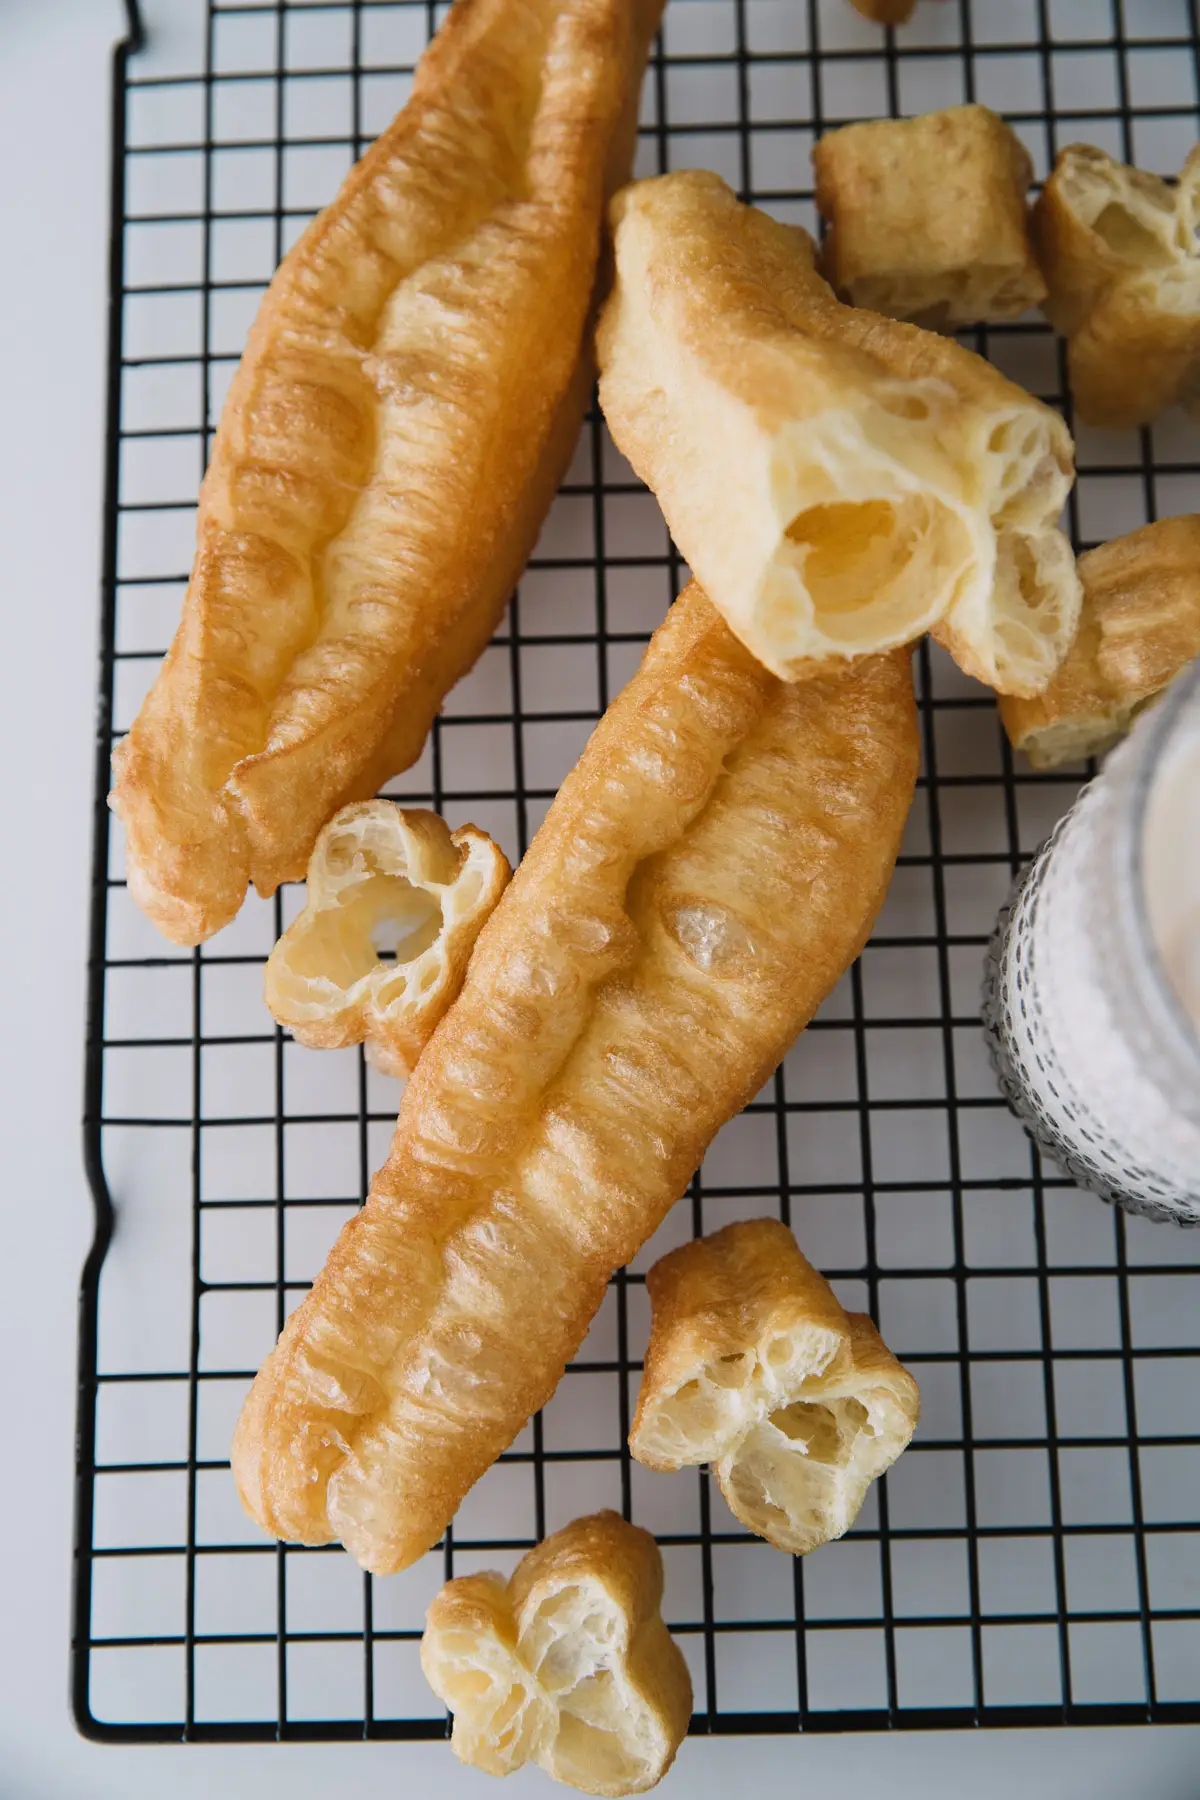
The successful youtiao should have a crisp shell and large holes in the center.
What to serve with Youtiao.
The best and my dream way of serving youtiao is to serve it with soy milk either soaked or not. I love to deep youtiao into soy milk. It presents a totally different taste and texture after absorbing soy milk. You can also serve it with congee too.
By the way, I strongly recommend matching youtiao with smashed cucumber salad.
You can also combine youtiao with other food like Chinese rice balls (fantuan) and steamed rice noodles also known as Cheung fun. It can add some lovely crispy texture.
How to store and serve
- Freshly deep-fried youtiao has the best flavors and taste. If you have leftovers, keep them in the fridge in an air-tight bag for up to 7 days.
- How to reheat: you can choose to re-deep fry them with a lower heat. You can choose to reheat it in the oven. 4-5 minutes at 180°C/ 356°F
Youtiao- Chinese doughnut
Ingredients
- oil for deep-frying
- 1 tbsp. vegetable oil for brushing
Dough Ingredients
- 2 cups all purpose flour , unsifted around 300g
- 1 tsp. baking powder
- 1/4 tsp. baking soda
- 1 egg
- 120 ml water +5ml for adjusting based on the size of the egg
- 1/2 tbsp. vegetable oil
- 1/2 tsp. salt
- 1/2 tsp. sugar
Instructions
Make the dough
- Stand mixer method: in a stand mixer, add all the ingredients together and then knead on low speed for 7-9 minutes until the dough is quite elastic. Shape into a ball and then cover with a plastic wrapper and set aside to rest. The dough will be like the high water content bread dough.
- By hand: combine the dry ingredients, baking soda, baking powder, salt, and sugar with flour. Crack the egg and add oil. Stir with a chopstick or a spatula to mix the ingredient well. Then start using your hand. I love the method of using the fist to press the dough gently, this helps a lot with the sticky problem. Once a dough is formed, cover and rest the dough aside for 15 minutes. Then repeat the process until the dough becomes almost smooth on the surface. No need to be super smooth! At this stage, the dough will be super soft but not sticky. We only need the gluten network to be formed. Cover well and set aside for 1 hour.
- Shape the dough into a long retangle and brush some oil on the surface (this can help to avoid sticky problems after the later stage of shaping and assembling). Set aside and resting for 2 hours. If you are in a hurry, you can shorten this to 1 hour.
Assemble the deep-frying strip
- Cut the rectangle into strips around 3cm wide.
- Take a chopstick, wet it with some water, and work a line in the center of one piece of the strip.
- Lay one stripe over the other one and press a mark in the center (lengthwise). Water helps to make sure the two pieces stay together in the deep-frying process.
Deep-fry the youtiao
- Heat the oil to around 180 to 190 degrees C (400 degrees F). Then hold the two ends and slightly stretch the strips (or slightly adjust the length according to your frying wok).
- Gently slide into the oil and roll around continuously with chopsticks. This can prevent any surface of the youtiao is overcooked and thus firmed too quickly. Once the youtiao expands and turns golden brown. Transfer to a baking rack to drain out the extra oil. The whole deep-frying process may need 1 minute.
- Do this by batch and use a slow fire to keep the temperature of the oil. You can fry two youtiao each time but adding too many ones will decrease the oil temperature immediately, and usually, we don't have enough space for them to roll and rotate. So take your time.
How to store and serve
- Freshly deep-fried youtiao has the best flavors and taste. If you have leftovers, keep them in fridge with an air -tight bag up to 7 days.
- How to reheat: you can choose to re-deep fry them with a lower heat. or you can choose to reheat it in the oven. 4-5 minutes at 180°C/ 356°F
Video
Notes
Nutrition
Hi there! Great recipe, can’t wait to try it, I was just wondering how you measure your flour since it’s not weighed out in grams. Would it be appropriate to spoon and levelled the flour or just scoop it from the bag? I hope this doesn’t sound confusing!
Thanks so much ?
I directly scoop it from my flour bag.
Hi, Elaine. Can u describe the weight all of the ingridients in gram?
Is the photos is the real result of your Youtiao?
Sure, that’s youtiao from my oil wok.
nice.. in my place we call it pak tong ko.. north malaysia..the name were copy from thailand.. but the shape same as youtiao. i have tried a lot of recipe but i cant make it to be more gas inside.. going to follow your recipe. hope for success. thanks.
Hi Elaine
Don’t know where I went wrong. The youtiao was ‘doughy’. I kneaded the dough until in was eslastic and rested it for a day. Can you suggest where I went wrong?
Cecilia,
It might be caused by two reasons
1. Your dough is not well knead.
2. You kill the bubbles in the later cutting process after resting.
Next time, knead the dough for a longer time and be gentle when cutting them into strips.
I really like youtiao. The only thing I dislike is need to use lot and lot of oil to deep fry it. Always not sure what to do with frying oil. 🙁
Btw, can I store the fried youtiao in freezer and use it later?
Thanks
Sure, you can freeze youtiao in for later.
What is the difference between baking powder and bicarbonate of soda? Can we us water instead of milk? Thank you.
Hi,
For your information, baking powder contains baking soda, cornstarch and other ingredient. They work similar. However,baking powder is neutral while baking soda is alkaline.
May i know whether the milk u use is powder or not?
I use whole milk. But milk powder can work fine too.
How much youtiao is in one serving? Not one stick surely?
Angie,
This actually depends what to serve with. Usually youtiao is not served along, sometimes with soy milk or congee.
Hi I tried this receipt and I can’t get the inside
To look like yours. It’s like thicker inside
Like a bread
Any Subjection
There might be several reasons. Firstly the dough is not well knead and rested. Secondly, you removed most of the bubbles during the shaping before frying. Please do not be frustrated, continue trying and paying more attention to details.
Can you share the yeast dough recipe ?
I don’t use yeast dough in daily cooking, but I will list in on the plan.
Hi Elaine, thank you for sharing this recipe. Make it yesterday and happy to say that is turn out really nice. The only thing i like to ask is why is the youtiao not crispy like store bought?
Made Tau Suan to go with the youtiao. .
Have a good weekend.
Sarah,
The crispiness is mainly influenced by the oil temperature. With no additives, homemade version can become moist very quickly. If you want a crisper version, fry with a slightly higher oil temperature.