
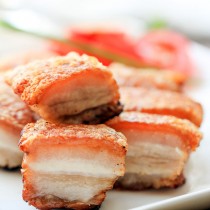
The ultimate guide to perfectly done Cantonese crispy pork belly with oven at home. Crispy pork belly is one of my favorite Cantonese dishes for the years in Guangdong province. Each time when I have a chance to enjoy Guangdong cuisine, this crispy pork belly is one of my choices.

After I learn how to make crispy pork belly from a Cantonese friends at home several years ago. I am always trying to find ways and information for a better result and trying to understand how every step works. And this is my ultimate guide.
Cook’s Note
This is the most simplified version for home cooking. I will introduce some extra steps if you want to bring this to the next level.
1.Choose the right part of pork| you should use pork belly to make crispy pork belly.
2.Poke as many holes as possible on the rind. The fat oil produced in the roasting process need ways to come out. Why we need oil coming through the holes? Because hot oil brings hot temperature, which can keep the rind something like gently deep-fried for a quite long time.
3.Applying baking soda or white vinegar can help to soften the skin and thus making the crispy pork belly even fluffy. But the remaining flavor of baking soda may bring some bitter taste to the skin. So the best solution is to set the pork for 30 minutes and then wash the skin before air-drying. I did not include this step in this recipe since it is not quite necessary for me.
4.The salt layer can help to absorb water and keep the skin dry. Cover a layer of sea salt on the surface can help to absorb the water released in the early of the roasting and keep the rind dry.
5.Marinating the pork belly for a longer time, at least overnight. We are roasting a large piece. During the marinating time, do not cover the pork belly with plastic wrapper. Place it in a large bowl and let it dry in the fridge.
You will need
- 1000g pork belly with beautiful layers
- 2 small chunks of ginger
- 2 scallions
- 1 tbsp. cooking wine
- 6-10 Sichuan peppercorns (optional)
Marinating
- 1 and 1/2 tsp salt
- 2 tsp. Chinese five spice
- 1/2 tsp. sugar
- 1 tsp. white pepper
Roasting
- sea salt to cover the meat
- white vinegar for brushing
Instructions
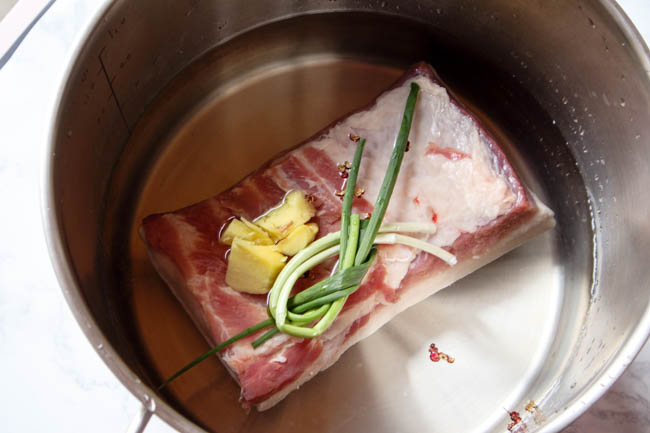
Place the pork belly in a large pot (rind site down) with clean water, add cooking wine, scallion, ginger and sichuan peppercorn. Continue cook for 3 minutes after boiling.
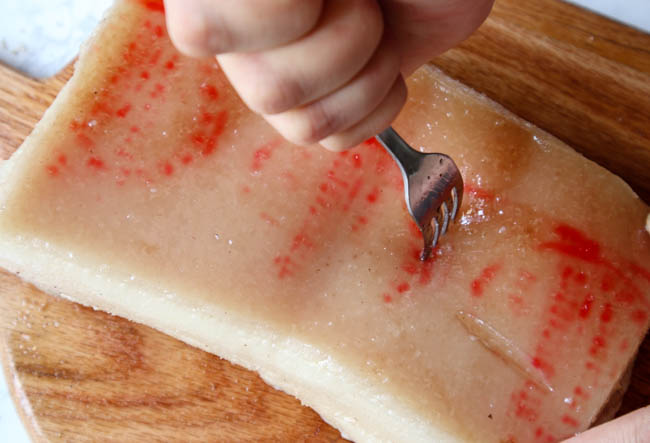
Transfer the pork out and pat dry the water. Then pork as many as possible holes on the rind. Back and forth and repeat several times. This is the most important step. After the hard pork process, apply a small pinch of salt on the rind.
Cut two shallow lines on the pork (only the lean part, not deep to touch the fat) and then sprinkle the dry rub evenly.
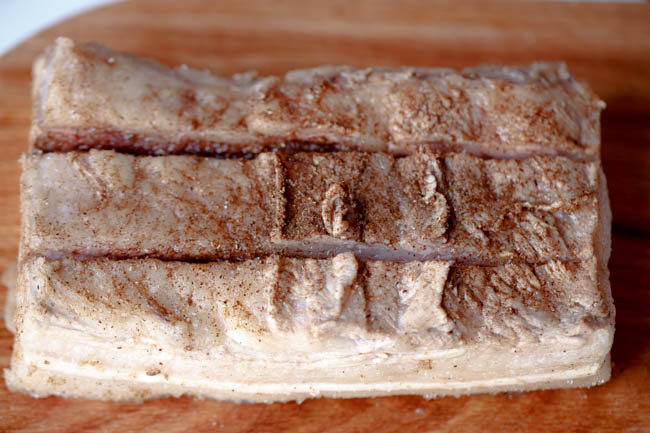
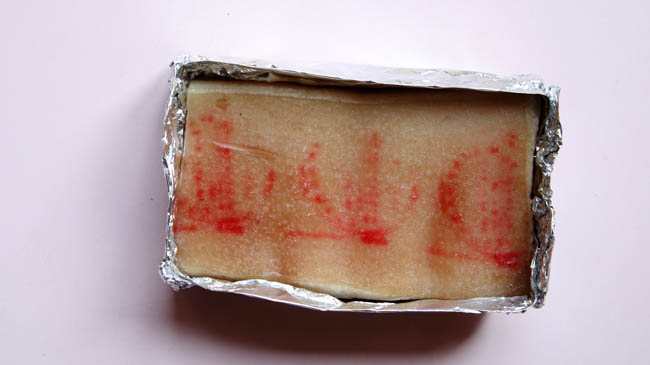
Wrap the pork belly with foil wrappers and place in fridge overnight.Uncovered please, we need the rind to be dry before roasting.
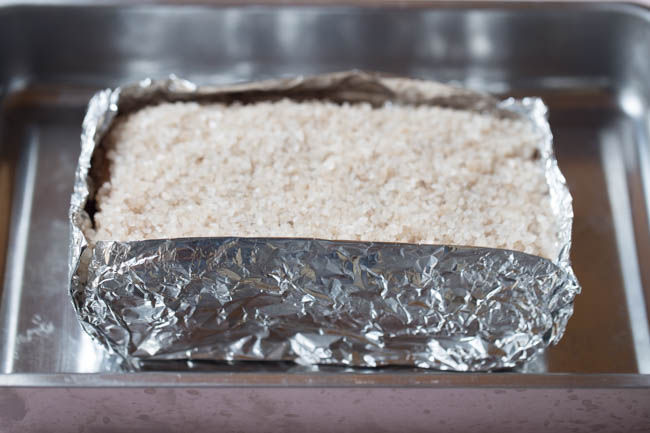
Pre-heat oven to 180 degree C. Brush a thin layer of vinegar and spread salt evenly to form a protecting layer. Roast for 50 minutes.
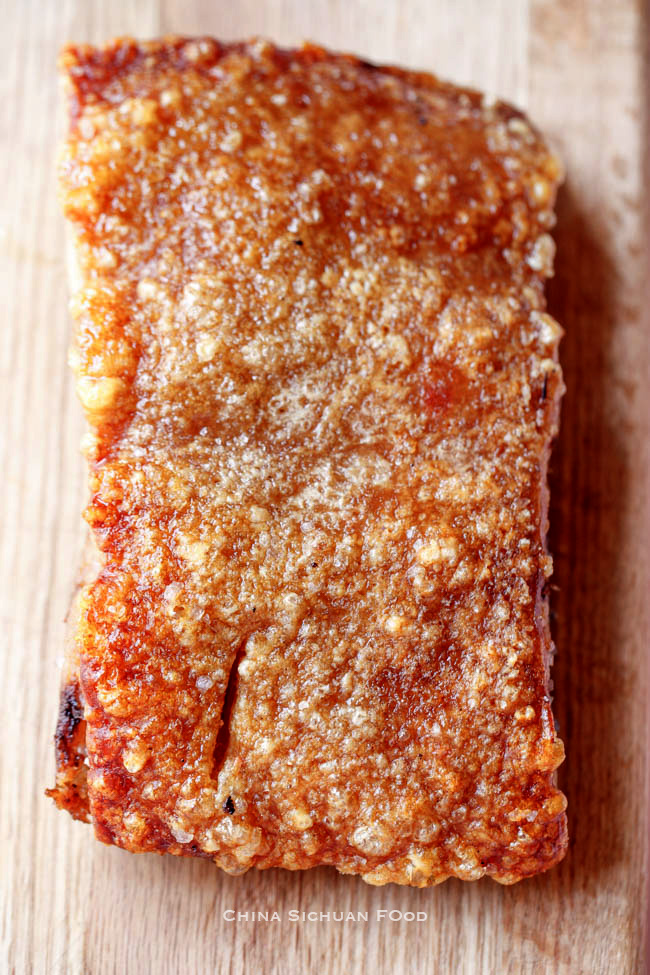
Remove the salt and place the pork belly on the middle rack. Remember to use a tray to catch the dropping oils. Turn your oven to upper fire mode and turn up the temperature to 220 degree C.

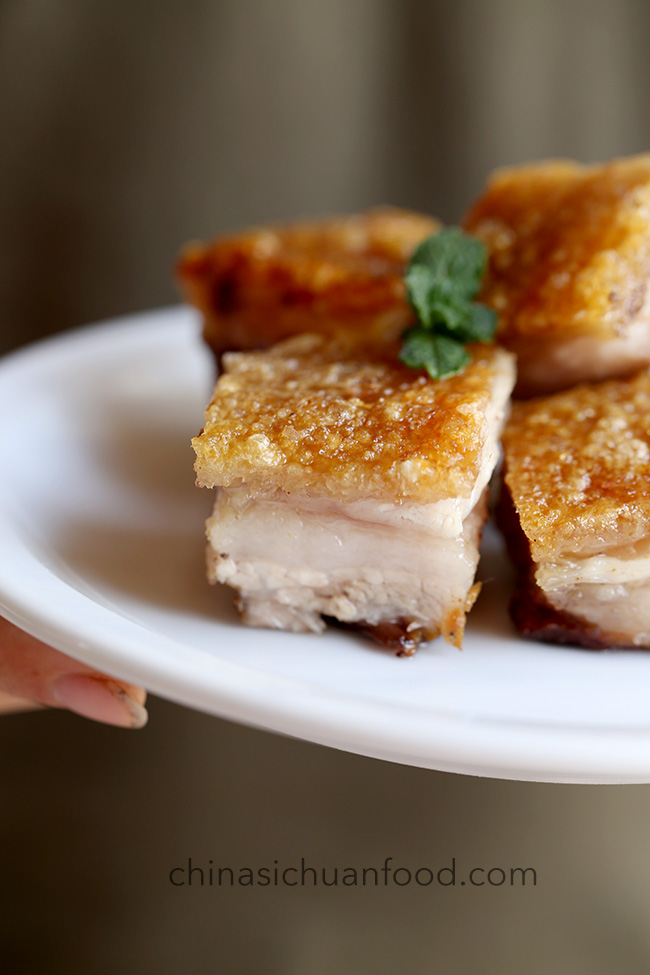
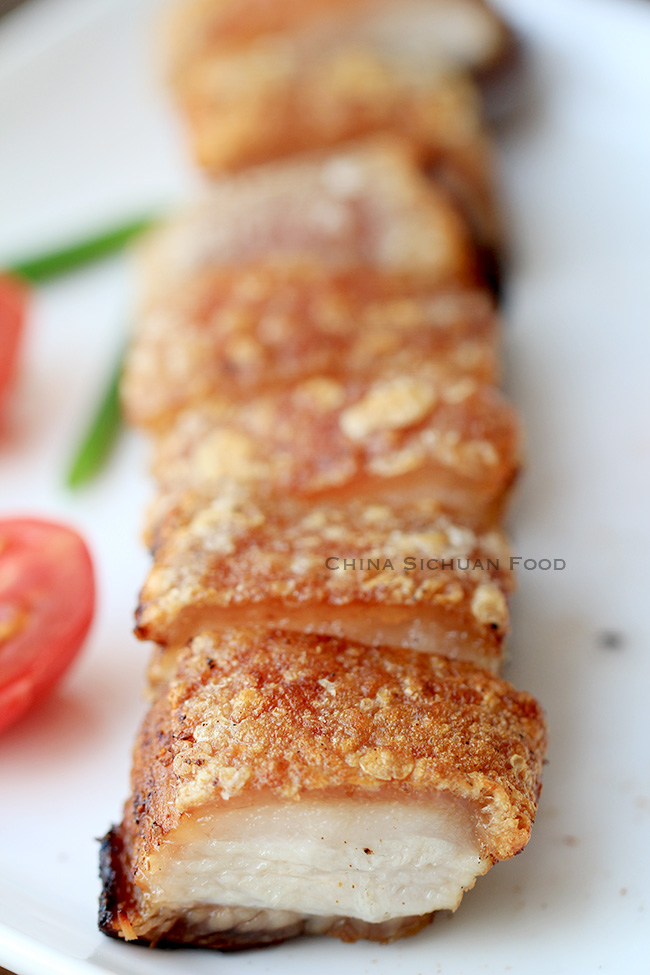
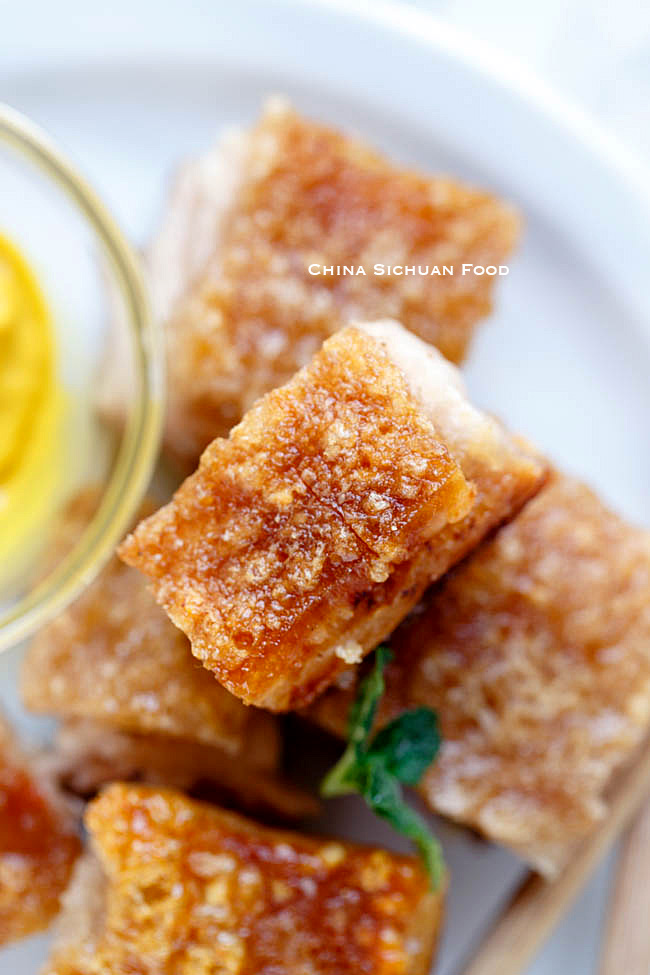
Continue roasting for 20 to 25 minutes until the skin is well crackled. Let the pork belly stay in the oven for 10 to 15 minutes until slightly cooled down. Transfer out and cut into small bites.
Cutting tips: place the skin side down. Cut the meat part firstly and then press the knife to break the crispy rinds.
How to serve
You can serve this with sugar, mustard sauce or Thai sweet and chili sauce. But not too many cubes each time. I would suggest 2 cubes for each individual. I make three strips this time and serve only 1 strip one meal. We have very similar dish in Western China, where the pork belly rind is deep-fried for crackling. Mixed chili peppers are used to remove the oily.
Other pork belly recipes
- Pork belly can be used in stir-fry recipes: twice cooked pork belly
- Pork belly can be roasted: Roasted pork belly with honey
- Pork belly can be red braised: red-braised pork belly.
Crispy Pork Belly (Siu Yuk)
Ingredients
- 1000 g pork belly with beautiful layers
- 2 small chunks of ginger
- 2 scallions
- 1 tbsp. cooking wine
- 6-10 Sichuan peppercorns ,optional
Marinating
- 1.5 tsp. salt
- 2 tsp. Chinese five spice
- 1/2 tsp. sugar
- 1 tsp. white pepper
Roasting
- sea salt to cover the meat
- white vinegar for brushing
Instructions
- Place the pork belly in a large pot with clean water, add cooking wine, scallion, ginger and sichuan peppercorn. Continue cook for 3 minutes after boiling.
- Transfer the pork out and pat dry the water. Then pork as many holes on the rind. Back and forth and repeat several times. This is the most important step.
- After the hard pork process, apply a small pinch of salt on the rind.
- Cut two shallow lines on the pork (only the lean part, not deep to touch the fat) and then sprinkle the dry rub evenly.
- Wrap the pork belly with foil wrappers and place in fridge overnight.Uncovered please, we need the rind to be dry before roasting.
- Pre-heat oven to 180 degree C. Brush a thin layer of vinegar and spread salt evenly to form a protecting layer. Roast for 50 minutes to 1 hour.
- Remove the salt and place the pork belly on the middle rack. Remember to use a tray to catch the dropping oils. Use upper fire only at the temperature of 220 degree C, and roast until the rind is golden brown and well crackled.
- Let the pork belly stay in the oven for 10 to 15 minutes until slightly cooled down. Transfer out and cut into small bites.
- Cutting tips: when cutting the pork belly, place the skin side down. Cut the meat part firstly and then press the knife to break the crispy rinds.
Nutrition
This will not work with pork belly purchased from Costco. The slabs are way too thick. I noticed your pork belly is about half the thickness of the Costco ones. I had it in the refrigerator for over a day uncovered and with lots and lots of holes with a layer of salt and it still didn’t dry out the pork skin enough. The skin started to burn before it stated to puff up. I also did apply a coat of rice vinegar before coating it with salt.
This and all the other recipes online look so easy but I have to say, mine was a failure. I guess I need to try with a thinner slab of pork belly and leave it in the refrigerator a lot longer to dry out the skin more.
I Mac, I cannot figure out what’s wrong. But the recipe is really simple. I never met similar problem before. Go ahead and try with a thinner slab. But I also suggest slightly lower the temperature of your oven or place the pork in lower rack.
Was there enough fat on the piece of pork? One time I made it when home in Australia. It came up well but not as good as when I’ve made it in China. I think the difference was that the of meat was lean and didn’t have enough fat directly under the skin.
That may be a difference. Also, the pig might be fro different types so the skins are not the same.
Thank you for recipe. The pork belly turned out amazing.
Thanks Penny for the feedback. Nice to know it works out fine for you too.
Thank you so much for this recipe. I’ve been trying to find something like this for years and I tried this today, it was PERFECT. Thanks again!
Thank you Paul. This really is an amazing method for pork belly. Enjoy your cooking!
Thank you so much Elaine for the time you take to share these wonderful recipes, with great photos and detail. I will have to try this recipe even though we’re avoiding meat lately. But this is worth it 🙂 I have never found the 5 spices you mentioned in the supermarket – do you know which are they so maybe I can buy them separately? Thank you for a “to be“ very happy family meal
Paula,
Thanks so much for your wonderful feedback. If you failed to find Chinese five spice powder, check this post and make it at home.
Hi Elaine! I used your recipe and it came out wonderful! I did not create the salt layer on top but the skin still came out very crispy and delicious. Thank you the recipe and including all of your side notes. It was so helpful!
Thanks Lisa! Crispy pork belly has been my favorite dish too. Glad to know you love it too.
I love this recipe! It’s so good! The skin comes up beautifully and the flavour is great. I always eat more than the recommended two cubes because it’s so good 🙂
there are a set of golden rules: 1 you need to use a meat pricker ti get as many holes in the skin as possible. After pricking pour bvoiling water over the skin this will open up the prick holes, then patthe skin dry with some kitchen roll.set aside to air dry further Then use course sea salt and cover with a thick layer. get your oven as hot as possible full temperature then place your pork in the oven top shelf for around 30 minutes. then turn it down to gas mark 5. or around 190 until donethe salt will look burned but don’t worry about that. when it’s looking darl take it out and chip off the salt. if it’s not gone crisy all over or not crispy at all you can place it under the grill to crisp up the skin.I cook this quite often it’s a family favourite and always a massive hit with my diner guests. I serve it on a bed of egg fried rice with garlic and soy pak choy and Broccoli.
Do you boil it multiple times and poke the rind and alternate? (Step 2)
No. This previous step is only for blanching to remove any raw taste and also make the meat more denser. No need to boil it with multiple times.
Made my 1st ever crispy pork belly last night for my family. The results was great, everyone loves it. Just have to follow all the steps carefully. Was so excited to watch the pork skin crackling away in the over. Thank you for sharing such a great recipe,
Thank you, Melissa for such a wonderful feedback. It is so pleasing.
Hi Elaine,
I have tried this recipe twice from other food blogs before I found yours. Both recipes did not work. The rind was not as crispy as I would like. Your recipe looks really good and I am going to try it soon.
I have a question. Why do some recipes boil the pork belly and some do not? What is the secret to a crispy skin?
Please advise. Thank you.
Lucy,
I still recommend slightly blanching the pork belly and then cook the skin side for a while. On one hand, boiling shortly can help to remove any raw flavors. And secondly, it is also important to slightly soften the skin for later process. Hope this one finally works for you. Happy cooking.